Below are the steps and screens to create Expense Lease.
1. Enter the Payment Terms
2. Finalize the Lease
3. Authorize to Schedule
4. Export to Payables
5. Import the invoices in Payables
1. Enter the Payment Terms
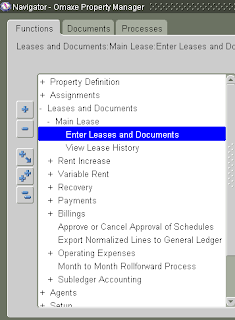
Navigate to --> Property Manager --> Leases and Documents -->Main Lease --> Enter Leases and Documents --> New
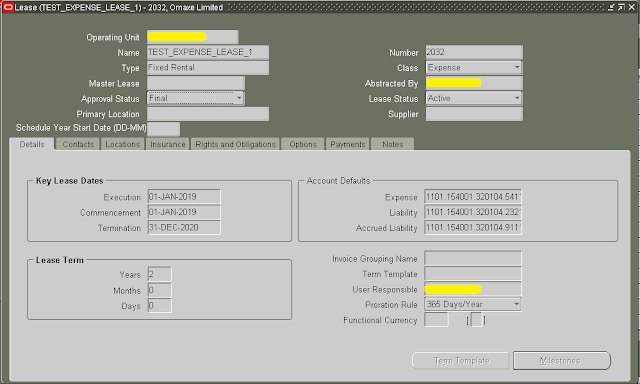
Fill the basic details as per below screen.
Navigate to Location tab and enter the location details against which lease is created
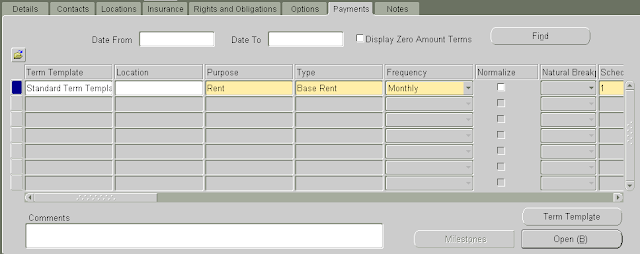
Navigate to Payment tab enter the Payment term Details
This will give you all the payment schedule lines. Initially all will be in Draft Status.
Then changes the payment status as below
Select the Approve or You can click the Approve Button to approve the selected line.
Once we approve and save then pn_payment_schedules_all Table gets updated.
4. Export to Payables
Once the selected lines are approved, Next step is to export those lines to Payables.
Navigate to Export to AP as below.
Click on Export to Payables and Enter the Lease Name and Click on Find.
Lines which are approved only those will come in this Export to Payables window.
Select the lines which you want to Export then Click on Export.
After click on export, system submit the program "Export Payment Items to AP" which create the entries in payable interface.
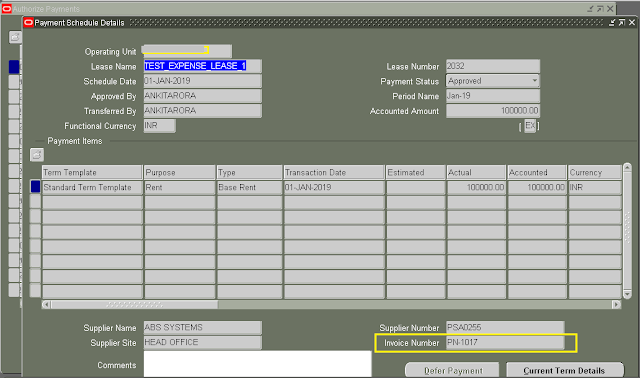
Once this program gets completed then you can see the invoice number updated on the below screen
After this we have to submit Payable Open Interface Import Program to Import in the Invoice in Base Tables.
1. Enter the Payment Terms
2. Finalize the Lease
3. Authorize to Schedule
4. Export to Payables
5. Import the invoices in Payables
1. Enter the Payment Terms
Navigate to --> Property Manager --> Leases and Documents -->Main Lease --> Enter Leases and Documents --> New
Fill the basic details as per below screen.
Navigate to Location tab and enter the location details against which lease is created
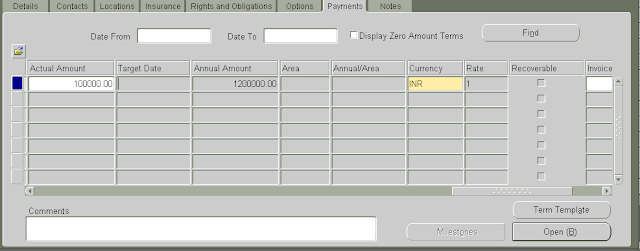
Navigate to Payment tab enter the Payment term Details
- Enter the Term Template, purpose and the frequency of the payment terms
- Enter the Schedule Day, Start and End Date of the payment terms.
The start and end date of the payment term gets defaulted with the lease commencement and termination date. It can be manually override before the lease is finalized.
- Supplier Name and Site against which the payment term is created
- Enter the Payment term Amount and Currency details.
After saving the lease below table gets populate.
Main Header : PN_LEASES_ALL
Details Tab : PN_LEASE_DETAILS_ALL
Contacts Tab : PN_CONTACT_ASSIGNMENTS_ALL
Locations Tab : PN_TENANCIES_ALL
Insurance Tab : PN_INSURANCE_REQUIREMENTS_ALL
Rights and Obligation Tab : PN_LANDLORD_SERVICE_HISTORY | PN_RIGHTS_ALL
Options Tab : PN_OPTIONS_ALL
Payments Tab : PN_PAYMENT_TERMS_ALL
Notes Tab : PN_NOTES_HEADERS
2. Finalize the Lease
Next step is finalizing the Lease.
Next step is finalizing the Lease.
Change the Approval status from ‘Draft’ to ‘Final’
As soon as we change lease status to final a pop up message comes.
To finalize the lease, click on ‘Save Now’ button. Once it is saved, the below concurrent will be triggered automatically
After the successful completion of the program "Schedules and Items" Lease status changed to final and lease is freezed to update.
"Schedules and Items" program will insert the records in
PN_PAYMENT_SCHEDULES_ALL
and
PN_PAYMENT_ITEMS_ALL
table based on the commencement date and termination date.
#Query to fetch payment lines details
SELECT psa.schedule_date
, psa.payment_status_lookup_code
, psa.org_id
, pia.due_date
, pia.payment_item_type_lookup_code
, pia.actual_amount
FROM pn_payment_schedules_all psa, pn_payment_items_all pia
WHERE psa.payment_schedule_id = pia.payment_schedule_id
AND psa.lease_id = 2032
3. Authorize to Schedule
Once the lease is finalized, system will generate the schedules for all the payment terms in the lease and these schedules will be available in
Lease and Documents > Payments > Authorize
Enter the Lease Name --> Click on Find
Then changes the payment status as below
Select the Approve or You can click the Approve Button to approve the selected line.
Once we approve and save then pn_payment_schedules_all Table gets updated.
4. Export to Payables
Once the selected lines are approved, Next step is to export those lines to Payables.
Navigate to Export to AP as below.
Click on Export to Payables and Enter the Lease Name and Click on Find.
Lines which are approved only those will come in this Export to Payables window.
Select the lines which you want to Export then Click on Export.
After click on export, system submit the program "Export Payment Items to AP" which create the entries in payable interface.
Once this program gets completed then you can see the invoice number updated on the below screen
After this we have to submit Payable Open Interface Import Program to Import in the Invoice in Base Tables.








No comments:
Post a Comment